


Overview
Photovoice is a tool that allows people to document their concerns, experiences, and lived reality through a combination of photography and storytelling.
Photovoice has been used to capture youth voices on a variety of topics, from nature connection and climate change to health and food systems.
It is best if this activity culminates in an exhibition where the photos and stories are shared with the rest of the school, other community members and potentially policy makers.
Learning objectives
- Fosters critical dialogue and promotes problem-based learning.
- Photo-based methods can lead to deeper understanding of place-based education on local environments (Briggs, et al., 2014), by increasing awareness of youth of their surroundings (Goodhart, et al., 2006), thereby raising awareness on community environmental issues.
- Empowers and builds students’ agency (Rose, et al., 2016).
- Enhances environmental education and awareness (Sprague, et al., 2021).
- Improves photography and storytelling skills.
Photovoice also has the potential to streamline students’ findings and voices into decision-making such as urban or rural planning, if local authorities and other community members that influence policymaking are invited and attend the final exhibition.
Links with the other resources and duration
This activity is best suited once you have gone through most, if not all, the lessons on Biodiversity, Fashion and Food systems and the Benefits of connecting with nature. Students will then be better equipped to find and talk about environmental issues that concern them in their surroundings.
However, Photovoice is a versatile activity that can be applied to any topic and so is well suited to explore a variety of issues.
The activity can be broken down into four phases:
- First phase: introducing the methodology,
- Second phase: giving students time to take the photographs,
- Third phase: discussing and selecting the photographs,
- Fourth phase: having the exhibition.
Across the four phases, Photovoice would take a minimum of two lessons which should be held two weeks apart to give students the time to create photography and storytelling material.
The two lessons could be conceptualised as follows:
- Introducing the Photovoice method and providing an overview of basic photography skills
- Showing, discussing and selecting the photos and writing/recording storylines
After the students have completed their Photovoice projects, you can move on to organizing the exhibition. The workload can be shared between you and your students. You can adapt the exhibition depending on the available resources. To harness the highest change-making potential of Photovoice, invite local and regional decisionmakers to your event.
Introduction
Photovoice has emerged as a participatory action research method. It was initially developed by Caroline Wang and Maru Ann Burris in the 1990s (Chanse, et al., 2017) to enable silenced and maginalised voices to be heard.
The main components of this method are taking photos and thinking of narratives or storylines that accompany them. These two should be exhibited together.
Photovoice enables individuals to use photography to explore, represent, and improve their communities.
The goal is to enable people to express community concerns and strengths, promote dialogue and knowledge about issues within a community and reach policymakers. This is done by inviting relevant stakeholders to look at the photos and storylines, allowing them to view diverse perspectives around a certain issue which can encourage and enable change.
As described by Wang and Burris who developed the methodology, Photovoice empowers community members to creatively capture issues they care about and act as agents of change. It also helps raise awareness of key local topics and offers a visual way for communities to share their perspectives. Photos are an accessible way to reach a wide range of audiences irrespective of age, gender, race and level of education.
This methodology has been widely used to express youth voices. For example, Photovoice has been used in schools to gather students’ perceptions, concerns and priorities within stormwater management (Rose, et al., 2016), identify places that enhance their wellbeing (Wang, 2008), explore how children make sense of climate change (Strack, et al., 2004) as well as to gain youth insight on a variety of health topics (Wang, 2008).
Photovoice gives an opportunity and space for students to express their perspectives, reflect on their experiences, and build confidence in their abilities. These support their growth into active and responsible members of their communities (Strack, et al., 2004). It has the potential to help students recognise their power to change things and develop their skills and confidence for future efforts (Rose, et al., 2016).
Empowering youth to understand that they can have impact is an important aspect when teaching environmental issues, as young people can easily feel helpless, which can turn into eco-anxiety.
Importantly, students usually like Photovoice: findings from one project organising an after-school teen centre in Southeast Baltimore found that youth enjoyed both taking photos (91% agreed or strongly agreed) and speaking about them (100% agreed or strongly agreed) (Strack, et al., 2004).
Materials
- Smartphones, or digital or analogue cameras
- Computer and cables for uploading photos to the computer
- High specification printer, photo frames or projector, depending on the type of exhibition
- Paper and pens for journaling and fieldnotes
- Voice recorders if storylines are being recorded
- A display place, which can also be virtual
- Participant consent forms
- Anyone that the students are taking a photo of should sign a consent form.
- To allow for public exhibiting of their photographs, signed consent forms by students, or by their parents / guardians if they are minors, are needed.
Photovoice can be flexible with the budget you have. If you have a small budget, the highest expense would be printing the photos and ensuring funding for the exhibition. You can hold the exhibition in spaces that would not charge for the use, such as the school or municipal buildings. Local galleries may be interested in offering you space once you tell them about your project.
If you have no budget to print the photos, you can collate them in a PDF document which can be published online on the school page or social media, as well as distributed to relevant stakeholders.
Pre-lesson preparation
To prepare for this lesson, you should become familiar with the Photovoice method so that you can talk to students about its origins and objectives, and what students will gain from it. You can also show your students examples of Photovoice projects (see below).
Unless you are already familiar with these, you should go over the basic photography skills that your students need to have before starting to take the pictures. The basics of photography are explained below, and you can use this as a guide.
Activity plan
Lesson 1: Introducing Photovoice and providing basic photography skills
Introduction to Photovoice
In this section of the lesson, you should cover:
- The background of Photovoice, how and why it is used, as explained above
- What the methodology implies and what students will be expected to create
- The topic chosen as the focus of this project
Within the context of the PLANET4B educational materials, topics should focus on biodiversity issues that students are experiencing within their communities.
Basic photography skills and tips
The theme of the photography
- Before taking a photo, think about what you want to show and what is the main object or subject of your photograph. Focus on it and make sure that the key component is clear to the viewers. If possible, try to avoid a background that will distract you from your subject.
- You can get creative and play with symbolism. Since you will also write or record a text to accompany the photograph, you will have an opportunity to explain your symbols to the audience.
Composition
- To make the composition of your photograph better, you can use the rule of thirds. The rule of thirds is a guideline- you can imagine your shot being divided into thirds, both vertically and horizontally, so that you have nine squares and four gridlines. Positioning the key focus of your photograph on the gridlines will improve your composition.

Here is an example:
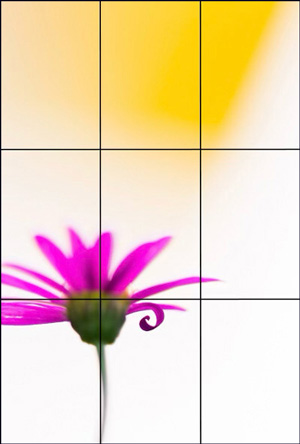
However, remember that this rule of thirds is just a guideline. You can create beautiful compositions without it, so don’t limit yourself and get creative.
- Pay attention to lighting and use it to your advantage. Many photographers love taking pictures at ‘golden hour’, which is the hour after sunrise or before sunset. If you’re taking pictures indoors, you can use artificial lighting to put the focus on the main subject of your photo.
- Try different angles when taking pictures. Sometimes low, high angles or side perspectives can work better than shooting at eye level. If you are not using an analogue camera, you can always take multiple shots and select the best one later.
Optional activity: Mini photo walk
To have a go at taking photos, you can give students a prompt, such as ‘Capture something that represents your community’ and go for a walk to give students a chance to take some photos. After taking 3-5 photos, regroup and ask each student to select one photo and explain why they chose it.
Intermediate step: Taking the photos
Students should take the photos within their own time, as homework. Giving a timeline of around 2 weeks provides enough time for students to be able to capture environmental issues that surround them.
Lesson 2: Discussion, storylines and exhibition
Discussion
Each student should choose between 1-3 photos they would like to display at the exhibition, depending on your class size and how much space you have at the exhibition.
During the discussions, you can use the SHOWeD method, distributing handouts to students that will help them formulate and express the meaning behind their photos. The handout can be found in Appendix E of the Facilitator’s toolkit for a Photovoice project.
The following questions are used in the handout:
- What do we see here?
- What is really happening here?
- How does this relate to our lives?
- Why does this situation, concern or strength exist?
- What can we do about it?
Discussing the photographs will help students create narratives that accompany them.
Storylines
After students discussed the meaning behind the photos, and thought about how to express it, they should either write down or voice record the stories they would like to share. You can leave it up to the students. The storylines can either be created in class or given as homework.
Exhibition
For Photovoice to be used as a catalyst for change, the outputs of Photovoice should be shared with community members that can influence decision making. You could invite parents, other students and teachers but also government officials, local media representatives and youth-serving organisations.
The venue chosen for the exhibition could be anywhere from schools to local art galleries and municipal buildings.
Printing
Consider photo quality when deciding on printing size. If the photograph is lower quality, this may be really visible when printing it to a much larger size.
If the narratives around the photograph are written down, you should print these as well and place them next to the photograph. If your students have decided to voice record the stories, these can be available to listen to through a speaker or headphones.
Virtual exhibition
If you don’t have the capacity to organise an exhibition, you can collate your students’ work into a PDF format and make a virtual Photovoice booklet. Here is an example of such a Photovoice booklet, created by Aboriginal youth in British Columbia.
Think about using social media to enhance the Photovoice project. Instagram and Facebook can exhibit the project, especially if you have a school account, or if a local gallery, or another stakeholder, would be interested in (re-)posting the outputs of the project. Using hashtags such as #youth or #biodiversity can help reach target audiences.
Examples of youth Photovoice projects
Below you can find some examples of how Photovoice has been used to engage youth in discussing issues within their communities. The topics that the projects below focused on are diverse, including homelessness, poverty, and climate change:
The Spartanburg Photovoice Project
Through Our Lens: Our Advocacy Journey
Youth voices on food systems and food equity
If you would like to dive deeper into Photovoice, see the references used in this activity guide. You can also have a look at A practical guide to Photovoice: Sharing pictures, telling stories and changing communities
Debrief
Debriefing is a collective discussion method that can help students process and make sense of their thoughts and emotions and identify next steps for action in a safe space, following creative methods and interactive lessons.
As you know your students best, you can carefully think of questions according to the age and knowledge of your students.
Check the instructions in the separate Debriefing activity to help you organise the debrief.